Vanilla WAMP in Under 30 Minutes
This guide will take you through the basic steps of setting up a vanilla / barebones 64-bit WAMP (Apache, MySQL, PHP on Windows) stack in less than 30 minutes using Apache 2.4, PHP 7.4, and MySQL 8.0. This guide uses Windows 10.
DISCLAIMER: This guide does NOT take you through all the security-hardening steps, like setting a root password on MySQL, nor does it take you through any additional configuration that’s not strictly required. It is up to you to decide what you need and any additional configuration steps to take. It’s -strongly- recommended you do not use this as a production setup unless you’ve thoroughly reviewed all of the configuration files and ensured everything is properly secured.
I’ll also note that MySQL is optional here – sometimes developers just want an Apache+PHP setup and they connect to some externally-hosted MySQL server. So if you don’t want MySQL, just don’t download it and skip over the MySQL Setup steps (in the command prompt section) at the very end.
Step 1: Create a WAMP Folder
Just use Windows Explorer to create a new folder called C:\WAMP. Inside that, create a subfolder called DocumentRoot (full path should be C:\WAMP\DocumentRoot).
Step 2: Download the Files
Download the following 3 ZIP files into the C:\WAMP folder you created.
Direct Links (If you want to use the same versions as in this guide)
MySQL: https://dev.mysql.com/downloads/file/?id=507824
Apache: https://www.apachelounge.com/download/VS16/binaries/httpd-2.4.52-win64-VS16.zip
PHP: https://windows.php.net/downloads/releases/php-7.4.27-Win32-vc15-x64.zip
MySQL 8.0
URL: https://dev.mysql.com/downloads/mysql/
There are multiple files here – you want the “64-bit ZIP Archive” of the Community Server. As of the writing of this guide, the latest version was 8.0.27.
Apache 2.4
URL: https://apachelounge.com/download/
NOTE: You should always download the Windows builds from Apache Lounge.
You want the latest 2.4 version that is Win64. It is usually the very first download link. This guide uses Apache 2.4.52 Win64, so the file to download was httpd-2.4.52-win64-VS16.zip.
PHP 7.4
URL: https://windows.php.net/download
It is EXTREMELY important that you download the “Thread Safe” version here, or else you won’t have the DLL for Apache!
Underneath the version, find the section starting with “VC15 x64 Thread Safe” (it’s usually the second section), and download the first link inside that section (the “Zip” link). This guide uses version 7.4.27.
Step 3: Extract the Files
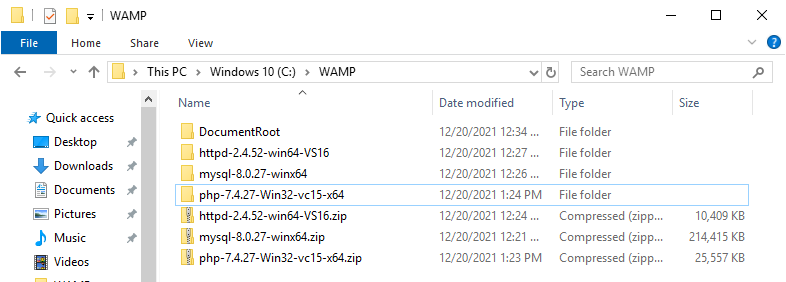
Using Windows Explorer, go to C:\WAMP and right-click on each ZIP file you downloaded, and choose Extract All… and then click on OK in the popup (just accept the default path it suggests).
DISCLAIMER: If you decide to customize the paths here, you’ll have to adjust them in the rest of the guide, too.
Your folder should look something like this now:
Step 4: Edit the Apache Configuration (3 minutes)
Use Notepad or your favorite text editor to edit the httpd.conf file. For this guide, the location of the file was:
C:\WAMP\httpd-2.4.52-win64-VS16\Apache24\conf\httpd.conf
Find this line:
Define SRVROOT "c:/Apache24"
Replace it with these 3 lines: (adjust the folder names appropriately if your version numbers are different)
Define SRVROOT "/WAMP/httpd-2.4.52-win64-VS16/Apache24"
Define DOCROOT "/WAMP/DocumentRoot"
Define PHPDIR "/WAMP/php-7.4.27-Win32-vc15-x64"
Find this line:
DocumentRoot "${SRVROOT}/htdocs"
Replace it with:
DocumentRoot "${DOCROOT}"
If you want to listen on a non-standard port, like port 8080 instead of port 80…
Find:
Listen 80
Replace it with:
Listen 8080
(or whatever port you want to use, as long as it’s free)
Find the section with all the LoadModule lights (about 180 lines from the top of the file), scroll to the end of the list of LoadModule lines and add these 2 lines:
LoadModule php7_module "${PHPDIR}/php7apache2_4.dll"
AddType application/x-httpd-php .php
Save and close the httpd.conf file.
Step 5: Add the PHP Folder to the System Path
In the Windows search box, type in:
sysdm.cpl SystemProperties
…and hit Enter, which should open up the System Properties box. Go to the Advanced tab, and click on the Environment Variables button.
In the bottom list (the system environment variables), scroll down until you find the Path variable and double-click it.
Click on the New button in the top-right and paste in the PHP path:
C:\WAMP\php-7.4.27-Win32-vc15-x64
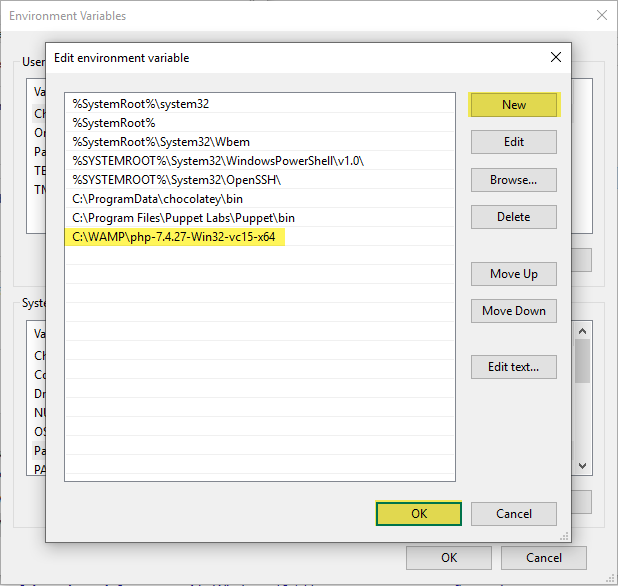
Click on the OK button to close the popup, and then OK again, then close the System Properties popup.
Step 6: Final Command-Line Steps
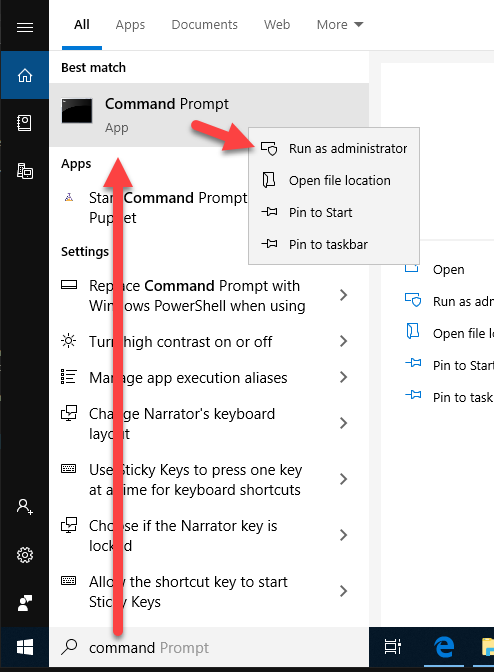
These final steps require you to run the Command Prompt as an administrator, so just type command into the search box, and right-click on the Command Prompt option and choose Run as administrator.
In this section, I’ll use “Type:” to indicate you should type the command and then hit Enter afterwards.
Make Apache Start with Windows
To install the Services hook so that Apache starts up when Windows starts, Type:
C:\WAMP\httpd-2.4.52-win64-VS16\Apache24\bin\httpd.exe -k install
Your screen should look something like this afterwards:
C:\Windows\system32>C:\WAMP\httpd-2.4.52-win64-VS16\Apache24\bin\httpd.exe -k install
Installing the 'Apache2.4' service
The 'Apache2.4' service is successfully installed.
Testing httpd.conf….
Errors reported here must be corrected before the service can be started.
NOTE: If you ever want to remove the Services, just rerun the same command but change “install” to “uninstall”
Setup MySQL
Type these 3 commands:
cd C:\WAMP\mysql-8.0.27-winx64\mysql-8.0.27-winx64
mkdir data
notepad my.ini
At this point, Notepad will open up (don’t close the Command Prompt yet) and ask you if you want to create a new file, so click Yes. Then paste in the following contents (again, double-check the folder paths to make sure they match what you have, and change the ports if you are already running another instance of MySQL or port 3306 is already taken):
[client]
port = 3306
socket = "/WAMP/mysql-8.0.27-winx64/mysql-8.0.27-winx64/mysql.sock"

[mysqld]
port = 3306
basedir = "/WAMP/mysql-8.0.27-winx64/mysql-8.0.27-winx64/"
datadir = "/WAMP/mysql-8.0.27-winx64/mysql-8.0.27-winx64/data/"
socket = "/WAMP/mysql-8.0.27-winx64/mysql-8.0.27-winx64/mysql.sock"
log_error = "/WAMP/mysql-8.0.27-winx64/mysql-8.0.27-winx64/data/mysql_error.log"
Save and close Notepad, which should bring you back to the Command Prompt window.
Type the following commands:
bin\mysqld --initialize-insecure --console
bin\mysqld --install
After all of the above, your command prompt window should now look like this:
C:\Windows\system32>cd C:\WAMP\mysql-8.0.27-winx64\mysql-8.0.27-winx64

C:\WAMP\mysql-8.0.27-winx64\mysql-8.0.27-winx64>mkdir data

C:\WAMP\mysql-8.0.27-winx64\mysql-8.0.27-winx64>notepad my.ini

C:\WAMP\mysql-8.0.27-winx64\mysql-8.0.27-winx64>bin\mysqld --initialize-insecure --console
2021-12-20T21:37:29.404950Z 0 [System] [MY-013169] [Server] C:\WAMP\mysql-8.0.27-winx64\mysql-8.0.27-winx64\bin\mysqld.exe (mysqld 8.0.27) initializing of server in progress as process 6140
2021-12-20T21:37:29.471503Z 1 [System] [MY-013576] [InnoDB] InnoDB initialization has started.
2021-12-20T21:37:30.138894Z 1 [System] [MY-013577] [InnoDB] InnoDB initialization has ended.
2021-12-20T21:37:32.210761Z 0 [Warning] [MY-013746] [Server] A deprecated TLS version TLSv1 is enabled for channel mysql_main
2021-12-20T21:37:32.218314Z 0 [Warning] [MY-013746] [Server] A deprecated TLS version TLSv1.1 is enabled for channel mysql_main
2021-12-20T21:37:32.637056Z 6 [Warning] [MY-010453] [Server] root@localhost is created with an empty password ! Please consider switching off the --initialize-insecure option.

C:\WAMP\mysql-8.0.27-winx64\mysql-8.0.27-winx64>bin\mysqld --install
Service successfully installed.
Okay, close the Command Prompt and reboot the PC (to make sure the system path changes take effect, and so you can verify that the services are automatically starting up).
Finished!
You should now have a functioning, barebones WAMP stack, serving up files from the C:\WAMP\DocumentRoot folder.
To test it, create a new file called C:\WAMP\DocumentRoot\info.php containing this one line:
<?php phpinfo();
Save that file, then open up your browser and hit this URL:
http://localhost/info.php
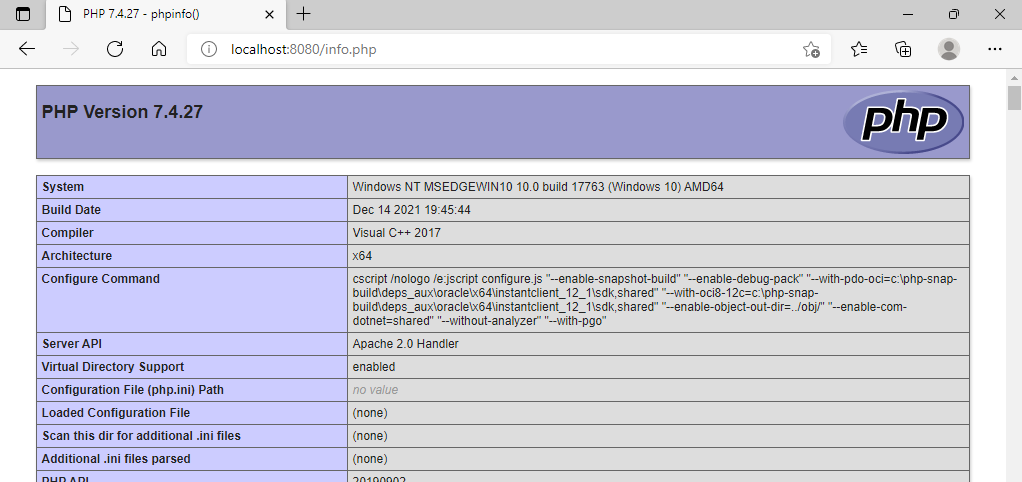
If you used a non-standard port in Step 4, such as port 8080, then just add the port into the URL:
http://localhost:8080/info.php
The result should be the built-in PHP information page:
Suggested Additional Step: Setup php.ini
PHP will come with 2 .ini files, php.ini-development and php.ini-production, that have some decent starting configuration settings. Just rename (or copy) php.ini-development to php.ini and restart Apache. This isn’t strictly necessary, but if you want to customize your PHP setup (e.g. enable some extensions), you’ll need that php.ini file.
Any time you change the php.ini file, you will need to restart Apache for the changes to take effect, since PHP is running as an Apache module.
To restart Apache when it’s set up as a Windows Service, just type “services” into your Windows search box, hit Enter on the Services component and you should get a popup with all the installed services. You should see an entry named Apache2.4 – just right-click on it and click Restart. It should restart in a few seconds.
Suggested Additional Step: HeidiSQL
HeidiSQL is simply a free GUI management tool for different databases, including MySQL. It is similar in functionality to PhpMyAdmin, but runs as a standalone Windows application. It has a very useful User Manager component, which can help you lock down your MySQL service, set passwords, run queries, etc…
DISCLAIMER: I have no affiliation with HeidiSQL aside from being a long-time user.
Leave a Reply